Saturday, July 16, 2016

How to Hills/Mountains

Ay dogs.

So this is a process I'm using for building these hill-y sets. It pulls from a lot of really cool tutorials I've seen relating to the fantastic world of model trains. 

This dude was my first inspiration for this process. A lot of these steps are going to take from his video/s, and I recommend them to anyone looking to make their own process. Mine... is not as good. But! Mine is also cheaper. and faster. Which is good for one person making an entire stop motion project.


- I've started most of these with two main ingredients. hope. and love. No none of those, actually it was just a large 2' by 4' project board (something like this) and a roll of chicken wire (something equally cheap). Good! now you've spend like 20 bucks for your main land mass, cool deal. 

You shape the chicken wire over the board in the desired length/form: 


I used a handful of screws tightened into the board to wrap various edges of the chicken wire down. this will be a messy process, so don't try and be super specific with how you want this thing to lay. You can really only emphasize main areas, and the chicken wire will bend as it wants. It's ok though, as long as you make sure you have areas you can work in potential shots with, you'll be fine. Nature isn't perfect either.
- Once you've gotten that tightened down, you'll want to snag some thin-ish quilt batting, like in the video. Lay that baby boy into place and cut off the excess. You can leave a little extra if you're a stickler and want to fold the fabric underneath the board or something.


- Now do as the man commands and get yourself a nice. fresh. dank. bottle of Mod Podge. This part is messy too, and you're going to have to deal with a lot of glue you brush on simply falling through the holes. OKAY. So, lift back the batting and brush on the mod podge to the chicken wire. Don't worry, enough will remain on the wires to hold down the batting. You're wasting a lot of glue, but we're not going to think about that. Make sure to focus on areas where the chicken wire is level with the wood, because you can really slather it on there for the batting to hold down directly to the board.

I don't have any pictures of myself doing this, because nobody reads this and I didn't care enough.

Give that juicy project a rest while that glue dries, maybe fill out a couple of full time job-applications so that you can finally move out of your parents home, but don't get your hopes up too much! Remember, stop motion isn't a skill anyone cares about anymore. 

- Now it's time to pick out your color. The one in the video, the tan-ish brown, works really well - and you won't really have to get anything mixed for you, as a lot of these neutral tones are readily available on the shelf, at places places like Walmart, where you can buy brown paint and tomatoes and a dvd and nobody will look at you weird. 

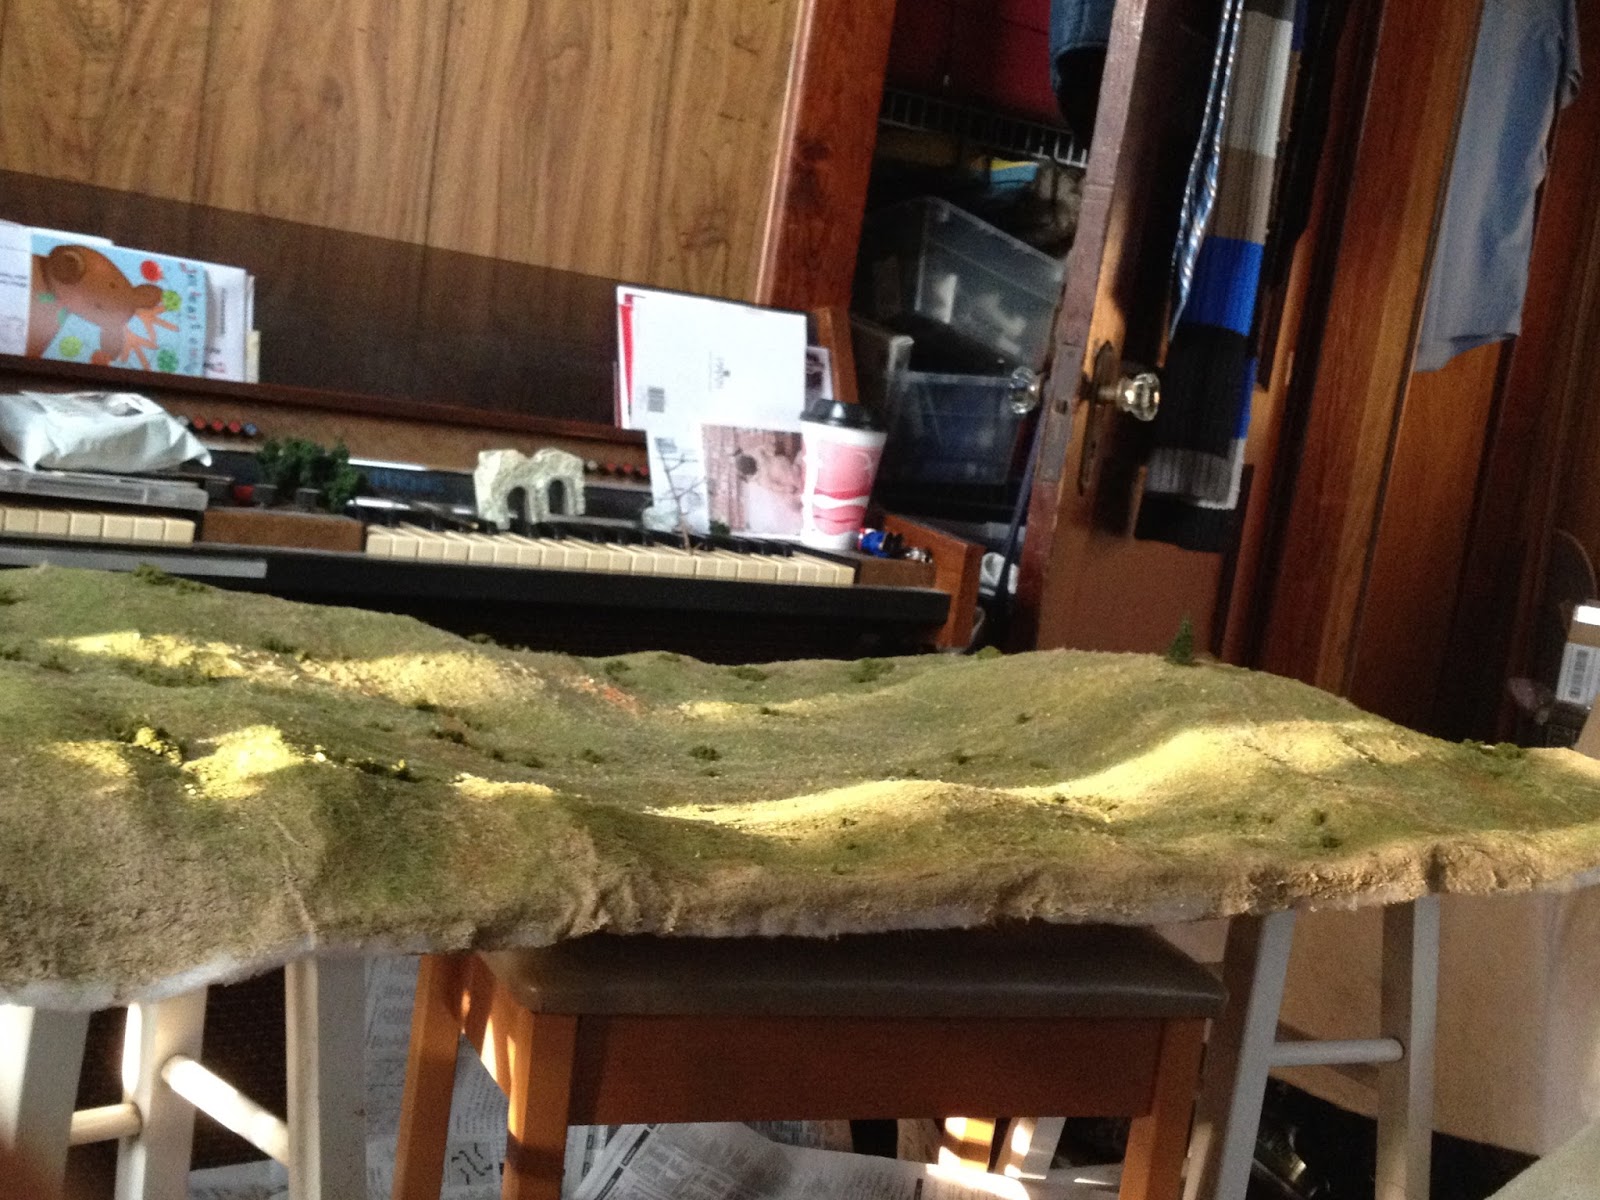
Here is how my end result looked when I went with the brown (and later added the green dust mentioned in the video.) 


This is, of course, jumping ahead to the finished product. However, I didn't have any in progress pictures of the brown being applied. 

-Now if you're me, you might be working on something weird. The hills I'm currently putting together are going to look like they are far off in the distance. Now if you think like a painter, you'll know that the farther back something is, the more the colors will resemble the sky's. So now you have blue hills, I hope you're happy.


-When you get paint mixed at the hardware store, you can get away with getting the cheapest quart available, because this ain't no deck. A quart turned out perfect for this panel. I honestly used every last drop, and got the entire thing covered. Worked out super well. 

Anyways, this brings us up to current times. I'm going to be using a dusting of light-brown ground foam. Woodland Scenic works fine, and you can order various quantities, depending on how much you think you'll need for a project. 

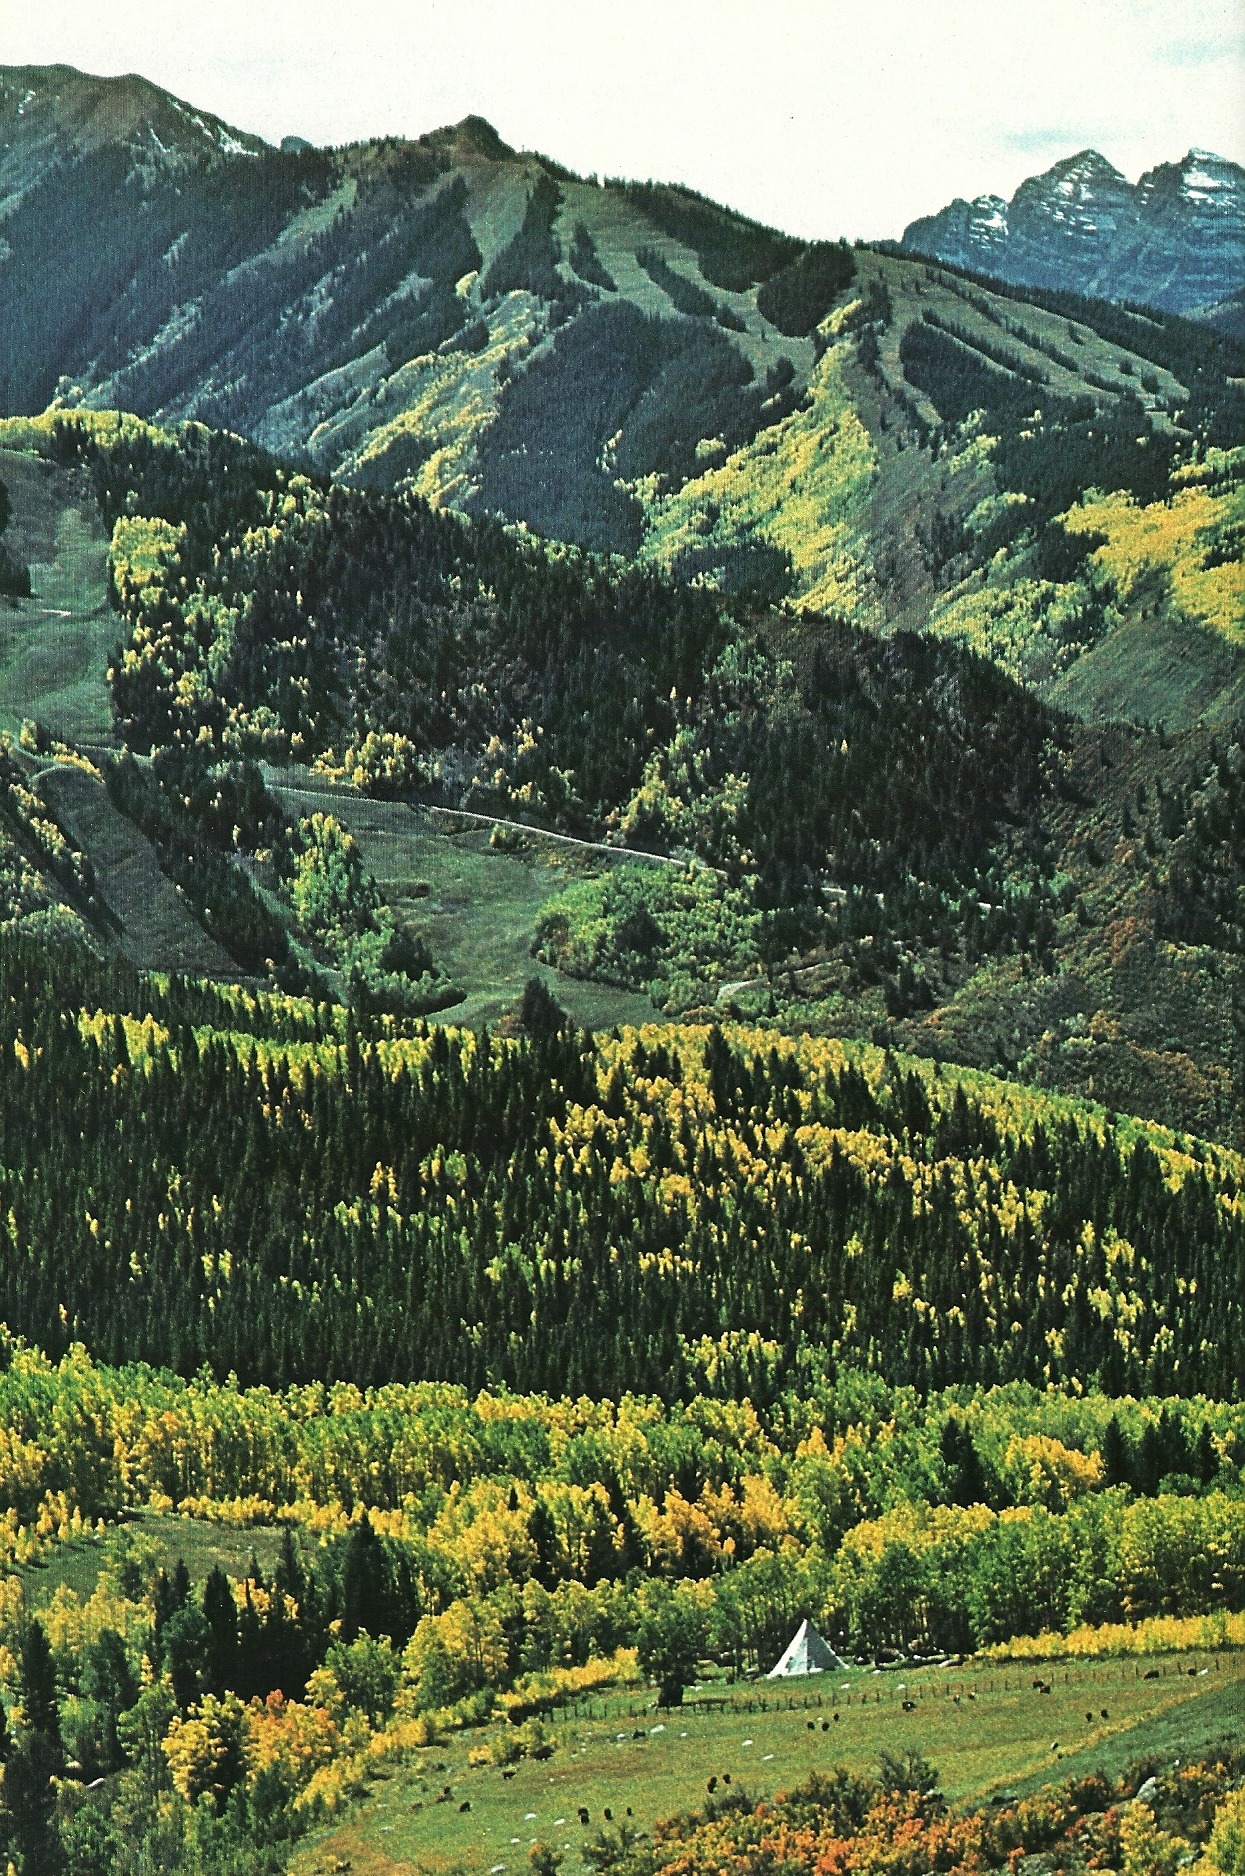
It's a hoop dream, but I'm aiming for a set as varied and colorful as this: 


Note the obnoxiously blue hills in the far back. Mine will not be as green, but you get the idea. I will update as I finish the second set of hills. Until then, stay fresh to death

Thursday, April 21, 2016

Opening Shot

This will take a while...


I wanted the opening shot to emulate one of my favorite logo clips of all time:


Along with the color schemes of some vintage National Geographic:


I must have gone through hundreds of these, I'd post more but I'll just let you peruse if interested. This has been my go to for framing/color/everything lately: http://vintagenatgeographic.tumblr.com/

Neatneatneat


Tuesday, January 26, 2016

Lark

Had a day off.. figured I could knock out a quick little guy.


Sparrow Finished-er and Beyond

    I've added some more technical nonsense to the model to make certain shots more interesting. Now there is some more stuff covering the areas of the glass I didn't like. 


Thinking about making 1 or two other ships to have sitting idly in the background. We'll see though, I'd like to start building some set pieces and storyboarding. The reason I've been building assets first is because I'd like to keep in mind certain physical limitations/capabilities of the models while I plan out the shots. 
I've had a lot of different landscapes and architecture buzzing around my head for this, things from yellowstone to dense english villages. I need to nail this look down before I do anything else. 
Also looking into a new computer, I need to up my tech game before I take on another big project. It'll be expensive but worth it. 
I'm still conflicted about how to shoot this. I imagine I'll need to bring some greenscreen skills back up to speed for wider shots. I will be animating with these "helping hands". They've already been delivered and they are AWESOME. It's a solid 8' by 8' or so, and really sturdy. Excited to actually work with some stiffer ball and socket joints. 
I also don't know how I'd like to animated the characters. My first thought was to have the characters appear minimally and as 2d animations. Their designs are simple enough. The only example of this juxtaposition I know of is "Dancing on the Moon":


Lots of techniques I wanted to employ with 2d on 3d are present, including the large rotating set piece set against a static background. I'm sure there are other examples out there, but searching for them specifically hasn't yielded much. 

More junk soon

Sunday, January 24, 2016

Sparrow Fin...ish?

STEP 5 AND THEN YOU FINISH IT


NSFW


You just paint and glue and done it. It's done then. #brodoyouevendone?

Anyways, it's done. I didn't feel like doing anymore in progress posts; the rest was just a lot of sitting around waiting for paint to dry. I might add a little here and there in the future, but I'm digging the minimal design so far. I don't like the plastic covering the cockpit. Those little fins stretching over the back of it should have come off before glueing it on there, they're really distracting. Shouldn't have used balsa wood, AMATEUR MOVE WES. It's fine, I'm not going for an golben glorbe for this animation. It's still really posable and light-weight, so a general success all around I guess.

Now what

Tuesday, January 19, 2016

Sparrow Progress 3

      Fitting in a few cockpit components, making sure the glass still fits over everything. The thrusters are going to look really cool, I think. I had to re-carve out some of the area at the bottom so that the fin could fit inside of the wood, kind of messy, but nobody will really see it.


Flip-flopping on potential colors; I've been really drawn to entire washes. They are both really memorable and stand out really well against abysmal backgrounds.


Next step is to fit some these unmoving pieces together, probably with some wood glue so that I can fill in an awkward gaps between the balsa wood and the plastic pieces. All in all, I'm really happy with how it's turning out. It's still a bit of a mess, but it is super lightweight and really posable. Both of those things will be kind of invaluable when it starts getting animated.

[image credits:
Voyage to the Forbidden Planet // Chris Foss
Translucent Worlds // John Harris
Retro Rocket // Les Edwards]

Sunday, January 17, 2016

Sparrow Progress 2

      I did a bit more gathering to find all the major pieces for the ship. Wood is still pretty rough in this one, and I still have to carve out some spaces for the thrusters.


I went ahead and carved out the space for the windshield, or whatever it's called. SPACE windshield. The picture is kind of bad, the underlying wood still needs to be sanded. I think this is the last time I work with balsa wood, this stuff breaks just from sneezing at it. I have to add in a little part underneath the front part of the glass because the part I was leaving on broke off when I was cutting out the cockpit area.